Are you ready to start making some Autumn-themed homemade sodas? I have just the thing!
In his The Wildcrafting Brewer, noted wildcrafter and fermentation revivalist Pascal Baudar discusses various ancestral methods for creating carbonated and alcoholic drinks. In that discussion, he gives examples of rich sources of natural yeasts which can be used to do so.
One such source of natural yeast that fascinated me was “baby” pinecones, possibly because I knew I had easy access to them as close as my backyard. I was also excited by the fact that, like a ginger bug or other SCOBYs, these yeasts could be kept alive indefinitely. And lastly, I was intrigued by the flavor profile potentially offered here (and the prospect of creating some piney drinks).
By immersing the pinecones in sugar-water with a ratio around 15-20% sugar to 85-80% water, the natural yeasts all over the pinecones (trust me, they’re there!) begin to grow and reproduce. This in fact easily and visibly happened very quickly on my first attempt, with some bubbles forming within just a couple hours.
Once you obtain your baby pinecones, make sure they are clean and free of dirt or critters. Small ants or other bugs may reside inside, so it is a good idea to rinse them thoroughly on spray setting with cool water. (Do not use any pinecone found on the ground, mature pinecones, or any that has obvious rot, mold, or infestation.)

Once you have the pinecones, here’s the basic process I followed:
1.) Fill a half-gallon jar with several baby pinecones, I suggest between 8-9 (or around 4-6 in a quart jar, and use half as much sugar and water than what’s discussed in the next step).
2.) In a saucepan or separate jar, combine 3 cups very warm, filtered or distilled water with between 100-150 grams unrefined or organic sugar. (If you don’t have a scale to measure in grams, 2/3 cup sugar will work perfectly.) Stir together thoroughly and allow to come to room temperature.
3.) With the pinecones already in the clean half-gallon jar, pour in the cooled sugar water. Give a good stir, making sure all the pinecones get wet. All the pinecones should now be either mostly or fully submerged. If you need more liquid, you can add up to 1/2 cup extra sugar-water (1/2 cup water combined with 1 TBSP sugar), but there should be at least around 20% free headspace (air) in the jar.

4.) Though normally keeping the lid sealed at room temperature, you should open it to release gas pressure and stir the contents once or twice a day. Within anywhere from 2-4 days, you should start to see a substantial amount of bubbling and air pressure forming.
5.) Once the culture is very bubbly and active, you may now mix it into sweetened liquids to carbonate them. (A sample recipe with measurements provided below.
Storage: You may keep the culture in the jar (with the pinecones left in) stored in the refrigerator. It will keep indefinitely, but a food source (and replacement liquid as needed) must be provided to keep the yeasts alive and healthy. You must stir in around 1 TBSP sugar each week. You no longer need to remove the cap to release pressure, other than at your weekly sugar feedings.
As mentioned, whenever you use the culture – typically between 1/4 to 1/2 cup of it to carbonate a one-liter bottle of your chosen drink (explained below) – you should also replace that amount of liquid to the culture. This should always be distilled or otherwise clean, filtered water, with a dose of sugar. This way there is always ample liquid to keep your pinecones immersed and fed.

Lemon-Juniper-Pine Soda
Here’s an easy recipe for a homemade soda using some complementary flavors to the pinecone culture. It’s like a Sprite with a pulse! (But with less sugar and far healthier ingredients.) It is really refreshing and is just one of endless drink possibilities you can now craft with your starter culture. It’s probably good to be aware these sweetened liquids to be fermented are typically referred to as “worts,” not to be confused with “warts” which are those gnarly bumps I got as a kid.
Alternately, as with other drink starter cultures, you can simply add it to fruit juices, sweetened teas or other sweetened liquids, to get a fizzy, probiotic version.
Cultures can vary. If you have issues carbonating this drink, you may wish to try one that doesn’t add an acid like lemon juice, which can impede some yeasts from developing. Creating your own worts can be fun, creative, and educational.
This recipe is for a one-liter flip-top bottle (serves four 8oz. cups)
You will need:
- 1-liter flip-top bottle
- Pinecone starter culture
- Measuring cups
- Citrus juicer
- Bottling funnel
- Medium saucepan & wooden spoon
- Fine mesh strainer
Ingredients:
- 3.5 cups filtered or distilled water
- 1/2 cup organic or other sugar
- Juice of 1 lemon
- 20-25 juniper berries
- 1/4 – 1/2 cup baby pinecone or other starter culture liquid e.g. ginger bug
- Pine bough with green needles, or other aromatic leaves or stems (e.g. lavender, rosemary, lemongrass, etc.)
Directions:
1.) Mash around half the juniper berries with the bottom of a spoon and place in the saucepan. Add the water and sugar and bring to a rapid boil, stirring occasionally.
2.) Turn off and remove saucepan from heat, immediately add the lemon juice, stir and allow to stand until the liquid is room temperature.
3.) Using the bottling funnel, pour 1/4 cup of strained pinecone starter liquid into the liter flip-top bottle. (Several hours or even the day before bottling, you are advised to take the starter culture jar out of the refrigerator and feed it a couple teaspoons sugar. Activate the culture by stirring it up vigorously in the jar, just before bottling.)
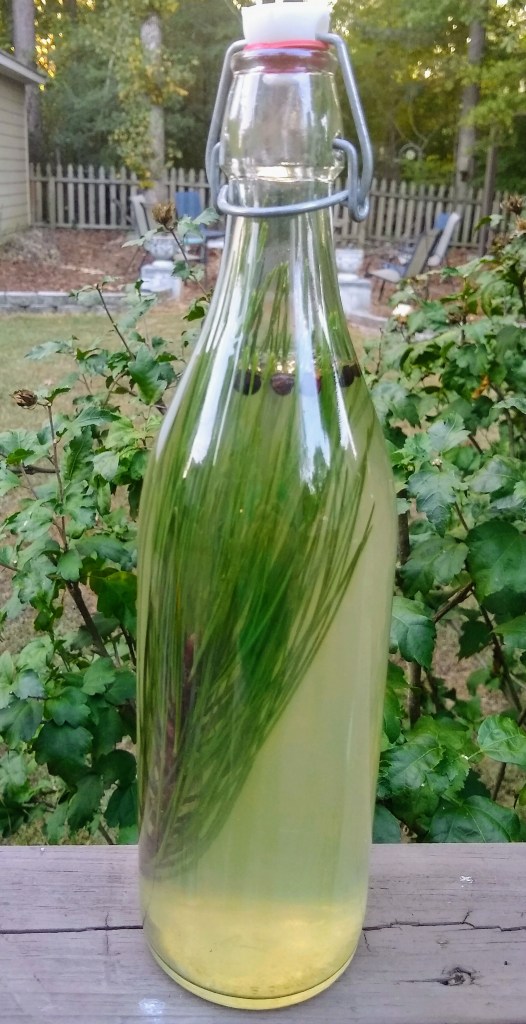
4.) Next, add the remaining juniper berries to the bottle, as well as the (optional) pine bough/needles. These are both additional sources of natural yeasts to help ensure an active ferment and carbonation.
5.) Thoroughly strain the cooled wort (the sweetened liquid) so that any lemon pulp and juniper bits are removed. Then, using the bottling funnel, add the the wort to the liter bottle. The liter bottle already has the starter culture, juniper berries, and bough in it; therefore, you may have a bit of wort remaining which won’t fit in the bottle.
6.) Seal the bottle and let stand at room temperature for three days. Then refrigerate overnight. The soda should be fully carbonated and ready to drink. Open slowly and carefully, keeping your palm pressed down on the flip-top to avoid overflow while gas escapes.
Troubleshooting: If there is no or poor carbonation, the starter culture may not have sufficed or been active enough. You should add another 1/4 cup of the culture and 1 tsp sugar to the bottle. Let the sealed bottle stand at room temperature again for 1-2 days to see if there is a visible change. In the future, you may find you need to put as much as a 1/2 cup of active / room temp starter in the bottle, and/or give it another day or so to carbonate.
As stated earlier, you can also try less acidic fruits in your wort, such as pear or peach; these provide an easier environment for yeast to thrive in. Ginger works great in a wort because it offers a great, refreshing flavor but isn’t too acidic. You may also find adding around 10 organic raisins to your bottle improves fermentation, providing an additional food source of food and nutrients for the yeast.
Want to support the continued development of this ad-free, cookies-free site and help with my dream of selling my own line of fermented products and sauces? Become a Patron! or make a one-time donation!

Discover more from Insane in the Brine
Subscribe to get the latest posts sent to your email.